
This is a 4-part guide introducing you to Phantasy Star Online 2. The purpose of these guides is to help new players become accustomed with the game in Japanese. This guide relates mainly with in game menus. This guide will update as the test progresses onwards.
[Menu Guide ] [Options Guide] [Basic Guide] [Open Beta Guide]
The Open Beta Begins June 21st, 2012:
[News Here]
- 3AM Eastern
- 2AM Central
- 1AM Mountain
- 12AM Pacific
Table of Contents
- Launcher and Graphic Settings
- First time signing into the Game #signin
- Player Id Screen #playerid
- Save and Load Characters #save
- Control Scheme (Direct Chat for Gamepad) #control
- Skip Tutorial #skip
- Chat Window #chat
- Main Menu #main
- Quick Menu #quick
- Character Menu #character
- Block Changer (My Room Access) #block
- Party and Quest #party
- Party Command #pcmnd
- Friend Request and List #friend
- Changing Classes #classes
- Visiphone #visiphone
- Teams (Guilds) #teams
- Desert Mining #desert

Main Menu
As you first start the game, you'll reach the main menu.
- SEGA IDでログイン Login with your SEGA ID
- ユーザー情報変更 SEGA ID Management Area
- クレジット Credits
- ゲーム終了 Quit Game
After choosing a ship, the next screen will ask for your SEGA ID and PASSWORD.

If you logged into your account from another PC, the Authentication message in the above screenshot will pop up. You must type in an authentication key that was sent to the email address of your SEGA ID account. If you did not receive an email, press the long bottom button, "メール認証キー再発行" for Sega to send you the email again.

Player ID Screen (Caution!)
You will type in a Player ID that you will use to represent your account on the game servers. Once you've set it, you will use this name for the remainder of this test and can not change it. The Player ID is separate from your SEGA ID and your actual character names. Please be careful not to put your password as your Player ID name.

Keyboard/Mouse or Gamepad?
You will then choose whether your main control scheme is
Keyboard [Left Button] or Gamepad [Right Button].

- キャラクター選択: Choose or Create a New Character
- サポートメニュー Support Menu sub choices: 1: Option 2: Sega ID 3: Online Manual
- ゲーム終了 End Game

You can click on the first slot which will create your first character:
キャラクターの新規作成.
This will lead into the character creation screen, please refer to the Character Creation Mini Guide for details on creating a character.
If you have already created a character your menu will appear like the screenshot above.
- ゲームを開始 Game Start
- 各種手続き > キャラクターの削除 Delete Character
When deleting a character, hold the [CTRL] key then press the left button.
You can create your first character for free. Your second character requires Arks Cash payment.

Characters you've created in the Character Creation Demo, or the Closed Beta Test can be loaded into PSO2's Open Beta Test client.
クリエイトデータ Create Data
- クリエイトデータ保存 Save Character Data
- クリエイトデータ読み込み Load Character Data
After creating your character, you will type in a name and start the game.

Keyboard Shortcuts (View Full Version)*
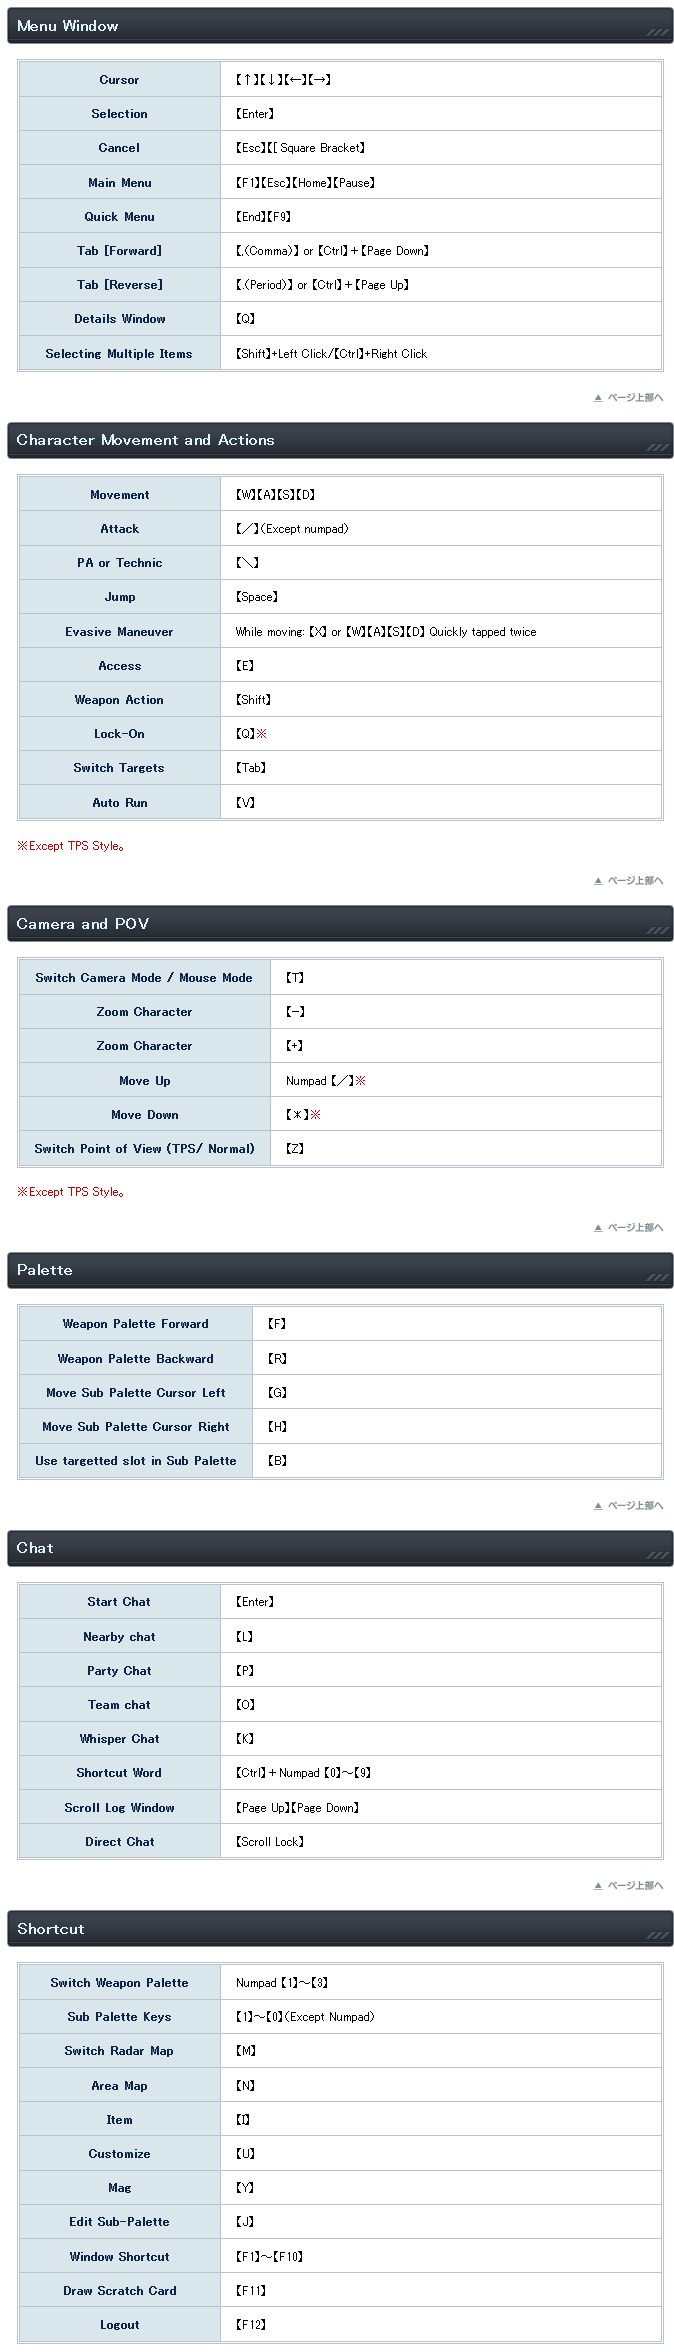
You can use these keyboard shortcuts in combination with the mouse to play the game. If you are switching from keyboard to gamepad, use the [SCROLL LOCK] key to enter Direct Chat mode. Direct Chat mode lets your press any key to start chatting immediately.
Moving the mouse will control the camera. Your left mouse button will either attack or select items if in a menu. Your right mouse button will use photon arts or cancel if in a menu.
The middle mouse button will access the quick menu.
*Spot a mistake? Please let me know.

Choose the bottom option to skip tutorial.
Even though you skip the tutorial, you still have to play the Episode Zero story quest.

There are 8 icons that make up the main menu for PSO2. Each of these icons are self explanatory.
アイテムパック Item Pack [1st Icon]
装備 Equip
- 武器装備 Equip Weapon
- 防具装備 Equip Units
- サブパレット Sub-palette
コミュニティ Community (3rd Icon with Chat Bubbles)
- フレンドリスト Friend List
- チームコマンド Team Command
- パーティーコマンド Party Command
- メール Mail
- 周囲のキャラクター Nearby Characters
マイデータ My Data
- キャラクター情報 Character Info
- 称号リスト Title List
- クイックメニュー Quick Menu
- コミュニケーション履歴 Communication History
- アークスカード情報 Arks Card
クエスト Quest (Globe Icon)
- マターボード Matter Board
- クライアントオーダー Client Order
- クエスト情報 Quest Info
システム System (Gear Icon)
- シンボルアート Symbol Art
- チャット設定 Chat Settings
- オプション Option
- ログウィンドウ Log Window
- オンラインヘルプ Online Help
ACメニュー AC Menu (Shopping Cart)
- ACショップ AC Shop
- スクラッチを引く Draw a Scratch Card
- 購入履歴 Purchase History
- レンタル有効期限 Rental Expiration Date
ログアウト Logout
- ゲームを終了する Quit Game
- タイトルに戻る Return to Title Screen

To access the Quick Menu, press [End](keyboard) or [Select] (gampad) or [Middle Mouse Button] to access the Quick Menu.
- ショートカットワード実行 Shortcut Word
- ロビーアクション実行 Lobby Action
- キャラクター頭上表示切り替え Change Character Info Display [Text over Head]
- オンラインステータス変更 Online Status Change
- スクリーンショットの撮影 Take Screenshots (Alternatively you can use Print Screen]
- 自分のマイルームへ行く Go to my "My Room"
- パートナー作戦指示 Partner Strategy for Photon Blasts
- レーダーマップ表示切り替え Switch Radar Map
- エリアマップ表示/非表示 Area map Display Toggle

When you press [T], you can click on characters with your mouse to access the Character Menu.
- ウィスパーチャットを送る Whisper Chat
- パーティーに招待する Invite to Party
- グッジョブを送る Send a Good Job!
- メールを送る Send Mail
- アイテムトレードを申し込む Initiate Item Trade
- アークスカードを見る View Arks Card
- ブラックリストに登録 Blacklist
- フレンド登録を申し込む Send Friend Request*
- マイルームへ移動 Go to their My Room
- モノマネ Mimic
An extra entry shows up for Teams Only: チームコマンド Team Command > Team Scout
*Caution! You may accidentally delete a friend from your friend list. Please note the differences in kanji:
- フレンド登録を申し込む Send Friend Request
- フレンド登録解除 Delete Friend

Around the Arks Lobby you'll see the Block changer to access different blocks (or channels) to meet your friends. You can access your My Room from the top-most entry in this block changer.

The Arks Lobby is separated into two distinct locations, the shopping area (lower level) and the gate area (upper level). The quest counter is located in the Gate Area:
- クエスト一覧から選ぶ Choose Quests
- クエスト中のパーティーに参加する Join a party in a quest
- クエストカウンターを出る Leave the Quest Counter
Click Here for a Detailed Quest Counter Guide

Quest Types
- アークスクエスト: Arks Quest: A quest that has specific goals. You can't return to the Arks Lobby unless clearing or cancelling the quest.
- ストーリークエスト: Story Quest: To unravel the mysteries of the world of PSO2.
- 緊急クエスト: Emergency Quest: A difficult quest that shows up for a limited time.
- フリーフィールド: Free Field: Travel through the field freely at your leisure. You can return to the Arks Lobby at any time.

Within the quest list menu, the following are available:
- すぐに出発する Immediately Start a Quest
- クエスト中のパーティーに参加する Join a party in a quest.
- クエストレコードを見る View Quest Record

Party Details
- パーティー名 Party name
- パーティーコメント Party Comment
- プレイスタイル Play Style
- 参加パスワード Password
- パーティーへ参加のみ制限 (Radio Button) Password protect your party.
- 他パーティーからのマルチプレイ要求も制限 (Radio Button) Password protect other parties.*
- レベル制限 Level Restrictions (上限 = Maximum) (下限 = Minimum)
- フレンド限定 (Radio Button) Friends Only
- チームメンバー限定 (Radio Button) Team Members Only
*Password protecting other parties will prevent you from meeting other parties in multiparty area, provided they don't know the password. This feature is useful for teams to host their own exclusive quests.

The Space Gate
When you accept a quest, you must enter the space gate at the center between the two Quest Counters.

Party Window
Press [Esc] to reach the Main Menu:
Community コミュニティ> party command (3rd) パーティーコマンド.
We will go through the LEFT side of this window.
- パーティーに参加 Party Participation: Check your party invitation.
- パーティーメンバー Party Members
- パーティー招待拒否設定: Refuse Party Invitation Settings
- パーティー脱退: Withdraw from Party
- パーティー設定 [Leader] Party Settings
- リーダーの交代 [Leader] Change Party Leader
- メンバーの除外 [Leader] Remove Party Member
- クエストの破棄 [Leader] Abandon Quest
- パーティーの解散 [Leader]: Breakup Party

You can send friend requests through the character menu. When you receive a friend request, a menu will pop up at the top of your screen.

Friendlist Menu
You can access your friendlist menu through the Main Menu:
Menu > Community コミュニティ > Friend List (1st on list) フレンドリスト.
There are several subdivisions for your friendlist, let's take a look at them below.
- 未返答の受信登録要求: Unreplied Requests: Friend Requests you received without accepting/rejecting them.*
- オンライン: Online: Friends who are online will show their block and location†
- オフライン: Offline
- ブラックリスト: Blacklisted players. †
*When you click on Unreplied Requests, you'll have the option to approve or reject the request. The top entry (フレンド登録を承認する) will accept their request.

†Be careful, you may remove a friend from your friendlist or a player from your blacklist by accident.
- ウィスパーチャットを送る Send Whisper Chat
- パーティーに招待する Invite to Party
- グッジョブを送る Send Good job
- メールを送る Send Mail
- アークスカードを見る View Arks Card
- フレンド登録解除 Delete Friend
- ブロック移動 Transfer to your friend's block.
- マイルームへ移動 Transfer to your friend's room.
- ログインコールを受け取る/受け取らない: Turn ON/OFF friend's sign-on notifications.
- ブラックリスト登録解除 (Only Under Blacklist Menu) Deletes blacklisted player.

- マイショップ My Shop
- フレンドパートナー Friend Partner
- 自分のアークスカード編集 My Arks Card
- アークスサーチ Arks Search [Search Players and Teams]
- 図鑑を見る View Collection (Weapon and Unit Collection)
- プレイ実績 Gameplay Achievements
- ランキング Ranking
- アイテムコード Item Code (For Bouquet Rifle)

PSO2 no longer uses character levels, instead, you will have class levels. You can switch to any class you want. (For example: If you are Hunter Lv3 and switch to Ranger for the first time, you will be Ranger Lv1. If you switch back to Hunter, you will return to Hunter Lv3.)
The Class Counter Menu:
- クラスの変更 Change Classes
- クラススキル習得 Learn Class Skills
- スキルツリーの追加 Add Skill Tree (AC Required)
- スキルツリーリセット Skill Tree Reset (AC Required)
- クラスカウンターを出る Leave Class Counter

Skill Tree
Refer to Skill Tree Simulator for translations!

Head to the team counter when your class level is 10 to create a new team! Type in your team name to begin.

Team Counter Window
On the right side of the window:
Team Settings
- チームフラッグ: Team Flag
- チームマスターコメント Team Mascot Comment
- チームサーチ検索への公開設定: Make Team Search Public: Allow your team to be searchable through the Visiphone.
- チームサイト: Team Web Site
On the left side of the window:
- チーム設定 Team Setup
- 入団の履歴 Enrollment History
- チームを解散 Breakup Team
- チームカウンターを出る Exit Team Counter

Press [T] to switch mouse modes and click on a player to enter the Character menu. The very last option will allow you to add members to the team.
Team Command チームコマンド >> Team Scout チームにスカウトする

Don't you worry! Some Japanese players were confused about the drill in the desert mission too and failed horribly! After watching a Nico Nico video on how you actually perform the mining, here's some advice.
The desert mission is split into three blocks. The first block is a single party area, the second block can be quite large and easy to get lost around the great wall. The third block requires you to cover pretty much the whole area until an EMERGENCY CODE: COLLECT spawns. You have a very limited amount of time to mine before you fail the quest.

Mash the "Access" button while the drill is glowing.
From the video, the player only uses the drill when there's a glowing white orb. Simultaneously as the white orb is glowing, the drill will actually spin. Once the white orb fades away, the drill stops spinning, and you can attack the surrounding enemies. If you successfully mine with two drills, you will complete the mission.
The Bouquet Rifle is not delivered to you in the Pre-Open Beta Test, you will receive a code sometime on or after the Open Beta Test.

In the log window, you can filter your speech to certain chat channels
- 1. Nearby
- 2. Party
- 3. Team
- 4. Whisper
Please put a guide on team merge, it's the main team send the merge invite to the other team, so that the other team goes into the main team