![]()
PSO2es Guide Navigator
Main Guide \ News & Updates \ Chip Database
Menu Guide \ Emergency Guide \ Eternal Tower \ Side Story
Link Slots \ Rush Arts \ Photon Dice \ esAbilities \ esOrders
[tabs class="yourcustomclass"]
[tab title="Lobby " active="active"]
Lobby Menu

| Lobby Menu | |||||
|---|---|---|---|---|---|
| 受け取り Giftbox |
オーダー esOrders |
レジャー Leisure |
インフォ Info |
||
| クエスト Quest |
編成 Organize |
ショップ Shop |
スクラッチ Scratch |
連動 Linkage |
その他 Other |
Click The Links For More Details

| Quest | |
|---|---|
| ストーリークエスト Story Quest |
スペシャルクエスト Special Quest |
| 外伝クエスト Side-Story Quest |
シリーズクエスト Series Quest |
Learn more about these options in the Quest tab above.

| Organize | |
|---|---|
| 装備 Equipment |
コスチューム Costume |
| チップ強化 Chip Grind |
チップ解放 Chip Unlocking |
| アイテム強化 Item Grinding |
クラス変更 Change Classes |
| 売却 Sell |
チップ倉庫 Chip Storage |
| 交換ショップ Exchange Shop |
|
| Sell |
| Sell Chips チップ売却 |
| Sell Items アイテム売却 |
Learn more about these options in the Shop tab above.

| Shop | |
|---|---|
| ACチャージ Buy AC |
ACショップ AC Shop |
| プレミアムセット Premium Set |
|
Learn more about these options in the Shop tab above.

| Linkage | |
|---|---|
| PSO2es倉庫 PSO2es Storage |
クイック探索 Quick Search |
| コレクトサーチ Collect Search |
ダークブラスト訓練 Dark Blast Training |
| ペット成育 Pet Raising |
マグ成育 Mag Raising |
| マイショップ My Shop |
受け取りカウンター Pickup Counter |
Learn more about these options in the Linkage tab above.

| Other | |
| システム System |
ヘルプ Help |
| コミュニティ Community |
キャラクター情報 Character Info |
| ストーリー閲覧室 Story Viewing Room |
チップ研究室 Chip Lab |
| タイトル Title |
オプション Options |
[toggles class="yourcustomclass"]
[toggle title="System"]

| System |
| 公式サイト Official Site |
| esアイテムコード es Item Code |
| データダウンロード Data Download |
| 端末引き継ぎ情報 Device Transfer |
[/toggle]
[toggle title="Community"]

| Community |
| フレンド Friend |
| メール |
| アークスカード Arks Card |
| Twitter連動 Twitter Linkage |
[/toggle]
[toggle title="Title"]

| Title |
| タイトルへ戻る Return to Title Screen |
| シップ選択 Ship Selection Screen |
[/toggle]
[/toggles]
Learn more about these options in the Other tab above.
[/tab]
[tab title="Quest"]
Quest Menu
| Quest | |
|---|---|
| ストーリークエスト Story Quest |
スペシャルクエスト Special Quest |
| 外伝クエスト Side-Story Quest |
シリーズクエスト Series Quest |
[toggles class="yourcustomclass"]
[toggle title="Story Quest"]
Story Quests
Story Quests follows Gene, More, Annette, and Bruno, as they embark on epic adventures.
- Completing [Normal] Story Quests with the highest score unlocks [Ex] Story Quests
- Ex Story Quests have considerably higher difficulty.
- Ex Story Quests awards Weaponoid Stones for the Exchange Shop.
- Clear Story Quests to receive character and weaponoid chips that don't show up in the scratch.
[/toggle]
[toggle title="Special Quest"]
Special Quests
Special Quests are specific quests that show up for a limited time. Some quests will show up over the span of several weeks, while others will only show up for a few hours. You can learn about current special quests within the News & Updates page.
Daily Quests

Daily Quests, like the name suggests, are quests which show up on specific days of the week. Daily Quests offers players the opportunity to receive Chip Unlocking Materials either randomly as a drop or as a reward for achieving high enough scores in each difficulty.
It’s imperative you google the current time in Japan to determine which daily quest is currently running!
| Day of the Week | Partial List of Materials |
|---|---|
|
Darker Core Mondays 【月曜日】 ダーカーコア入手作戦 |
 |
|
Amduscia Data Tuesdays 【火曜日】 アムドゥスキア素子を求めて |
 |
|
Photon Factor Wednesdays 【水曜日】 混沌を断ち切る力と源 |
 |
|
Naberius Data Thursdays 【木曜日】 ナベリウス素子を求めて |
 |
|
Lillipa Data Fridays 【金曜日】 リリーパ素子を求めて |
 |
Learn more about Material Chips.
[/toggle]
[toggle title="Side Story Quest"]
Side Story Quest

[button class="centered" style="btn-success btn-lg" type="link" target="true" title="Learn More" link="https://www.bumped.org/psublog/pso2es-side-story-quests/" linkrel=""]
[/toggle]
[toggle title="Series Quest"]
Series Quest
Series Quests follow the storylines of various weaponoids. You can play these quests even if you don't have the specific weaponoid chip.
[/toggle]
[/toggles]
Story Quest Menu

The Story Quest menu lists each season on the left. A "season" is similar to an entire "episode" within the main PSO2 storyline. The latest "season" will be listed at the top.
We will talk about EX Story Quests in a later section. #exquest
Area Details

Touch the location as indicated in the screenshot above. This opens up the [Area Details] which lists the following information.
獲得スコア記録 (Score)
- The accumulated score for that area.
- Each area has several quests. The score that you receive at the end of the each quest will be tallied and listed here. You can also repeat a quest to improve your score for that area.
スコアボーナス (Score Bonus)
- These are the items you will receive based on the score mentioned above. For example, you can acquire the first item in the screenshot if you acquire a score of 16 or higher. You can get the second item listed in the screenshot if you get a score of 24 or above.
Quest Details
Quests are listed on the right hand side of the screen. Tap the Quest Title area to open the Quest Selection menu.
Quest Information & Quest Selection

The Quest Info is listed on the left hand side of the screen. Scroll through this window to view the following details of the currently selected quest.
獲得スコア記録 (Score)
- The highest score for the currently selected quest.
- New quests will show up on the right hand side as you unlock them. Your score for each quest within this area will be tallied to unlock bonus items. These bonus items can be viewed by returning to the (Area Details) menu as mentioned in the previous section.
エネミー情報 (Enemy Info)
- An enemy icon will display here after you complete the quest.
有効属性予想 (Weak Element)
- This displays the elements that the enemy is weak to in the currently selected quest.
出現アイテム (Possible Item)
- This displays an item that has a chance to drop within the currently selected quest.
Quests will be displayed on the right hand side of the screen. To the right of the quest title is the 行動力 (Drive) consumption. Each quest you initiate will consume the amount of Drive listed for that quest. Once you run out of Drive, you must wait a certain amount of time for it to fill back up. You can also force the drive to fill by purchasing certain items at the shop.
Tap on any quest to move to the Traveling Companion Menu.
Traveling Companion Menu

Traveling Companions are players you can bring along with you on the quest. The first two tabs on the left lists players on your friends list, while the last gray tab shows [guest] players. Traveling companions will be marked "Unavailable" after you complete the quest. Each traveling companion will have allow you to use the chip displayed to the left of their name. Use these chips to your advantage if your lacking in a particular element, or if you want an additional boost.
Once the quest is over, you will not be able to use that specific companion until a certain amount of time has passed. You may, however, force them to become available by using an OP Med during Emergency Quests.
We will talk more about OP Meds in the Shop tab.
Departing Equipment Confirmation

The last screen before you start a quest will be an equipment confirmation screen. This displays your current weapon, unit, chip loadout, friend chip, and elemental value. Take note of each element listed near the bottom. It would be in your best interest to have an element with a value that's high enough to take on the enemy's elemental weakness. You can increase the value of a specific element by equipping chips and weapons with the element you wish to raise. This value will rise even more if you selected a traveling companion (from the previous screen) with a chip element that's valid against the enemy's weakness.
Once you're ready to depart, click the large hexagonal blue クエスト出撃 button to begin your quest. If however, you are not satisfied with your current equipment, press the blue 装備 Equipment button on the bottom right side of the window to edit your equipment.
We will talk about the equipment menu in the Organize tab.
Route Selection

Tap the hexagonal spaces to select a route.
Each hexagonal space will have the following icons:
- Blank
- Defense: Increases Defense Power
- Attack: Increases Attack Power
- Friend: Increases Friend’s Attack Power
- CP: Increases Chip Point Recovery
Selecting the same route icon three times will activate a PSE burst.
Battle Screen

Battle Screen Interface
- (1) Target Enemy’s HP and Elemental Weakness
- (2) Player's HP and CP
- (3) Chip Palette
- (4) Friend Assist and Chip
- (5) Options (Pause)
- (6) Change Target
- (7) Player's Elemental Value
[toggles class="yourcustomclass"]
[toggle title="Battle Tips"]
Battle Tips
- Certain chips consume CP (Chip Points), others will activate automatically under certain conditions. (i.e When receiving damage, or at the start of the battle.)
- Tap your partner’s weapon icon to have them assist you during battle. This icon activates after a certain amount of time.
- Your character’s elemental value can rise during battle when certain chips are activated. For example, some chips may activate with Just Attacks.
- You can use AC or Rappy medals to revive your character if they become incapacitated.
[/toggle]
[/toggles]
Incapacitation Screen

When you run out of HP, you are given three options:
| ラッピーメダルで復活 Revive With Rappy Medals |
復活薬を使用 Use Revival Meds |
リタイア Retire |
EX Quests #exquest

Ex Story Quests unlock when you achieve the maximum score within an area. For example, let's say Story Quest 1-1 has three quests, each with a max score of 6. If you succeed in getting an S-Rank score on all three quests, then you'll obtain a combined score of 18. Once this procedure is done, you will unlock Ex Story Quest 1-1.
The enemies within Ex Story Quests have considerably high HP and Attack Power (ATK). If you're not well prepared, one hit may completely wipe out your entire HP.
Completing each quest with a high enough score, will net you Weaponoid Stones as a [Score Bonus].
ウェポノイドストーン銀 (Weaponoid Stone Silver)
- Collect 20 of these and convert them to Weaponoid Stone Gold at the Exchange Shop
ウェポノイドストーン金 (Weaponoid Stone Gold)
- Collect 10 of these for Weaponoid chips at the Exchange Shop
This completes the [Quest] tab, scroll to the top to read the [Organize] menu.
[/tab]
[tab title="Organize"]
Organize Menu
| Organize | |
|---|---|
| 装備 Equipment |
コスチューム Costume |
| チップ強化 Chip Grind |
チップ解放 Chip Unlocking |
| アイテム強化 Item Grinding |
クラス変更 Change Classes |
| 売却 Sell |
チップ倉庫 Chip Storage |
| 交換ショップ Exchange Shop |
|
[toggles class="yourcustomclass"]
[toggle title="Sell Menu"]
| Sell |
| Sell Chips チップ売却 |
| Sell Items アイテム売却 |
[/toggle]
[/toggles]
Equipment Menu

The redesigned equipment menu allows you to change your weapon, units, and chips, all from within the same location. Certain areas of this screenshot are color coded to explain the types of items you can equip.
Weapons
- You can equip any weapon regardless of class.
- Equipping a different weapon type will automatically remove incompatible photon art chips.
Units
- Here you can equip a [Rear] [Arm] and [Leg] units.
Chips
- Here you can equip up to 5 chips for your palette.
- The leftmost slot is known as the [SP Slot].
- The chip equipped in the [SP Slot] will be granted a boost. In addition, friends who use your character out on quests will be able to utilize the chip equipped in the [SP Slot]. It’s highly recommended to put your strongest and most powerful passive chips in the SP slot.
Weapon Palette
- You are granted with 6 weapon palettes, allowing you to set different chip loadouts for each of them.
Equipment Menu 2

Take note of the set of four buttons underneath your chips.
Equip Link Slots (Blue Oval Button)
- Link Slots add extra effects during battle. Learn more about these extra slots by reading the [Link Slot] guide, as well as the [Rush Arts] guide.
My Set Menu (Orange Circle)
- Lets you store extra chip loadouts for future use.
Recommended Equipment (Green Circle)
- Lets the game automatically set your chips, weapons, and units. We'll discuss this in more detail in the next section.
Recommended Equipment

Tap the green circle in the equipment menu to open up the Recommended Equipment menu.

Tap the 詳細設定 Detailed Settings button.
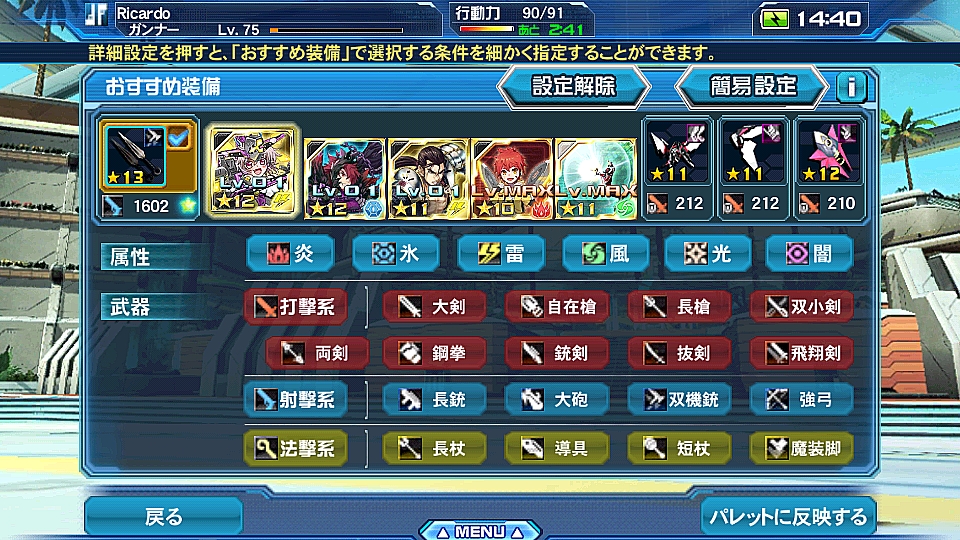
The game will automatically recommend your chips, weapon, and units based on the buttons you tap in this screen. For example, by tapping the [Fire] element, the game will automatically select a series of Fire chips. You can also tap on a weapon category, and the game will automatically select the weapon and the photon art chip compatible with the weapon type.
Once you are satisfied, press the blue button in the lower right corner to apply your changes.
Equipment Proficiency

Weapons and Units in PSO2es can be equipped at any class level. However, the item’s effectiveness will incur a penalty if it is equipped below a certain level. For example, if your Weapon Proficiency for a ★11 sword is 60%, then you will only be able to utilize 60% of that weapon’s original stats.
- Press the 装備する button to equip the weapon.
- Press お気に入り登録 to register the item as your favorite.
Chip Grinding

Chip Grinding allows you to increase the stats of a selected chip. The resulting stats will be shown on the bottom right corner of the screen. You can select up to 5 chips to use as fodder for the grinding process. All chips used as fodder will be destroyed.
To speed up the process, you can tap the green buttons highlighted in red in the screenshot above. Alternatively, you can click the large blue まとめて選択 button to the right to select multiple fodder chips at the same time.
Automatic Fodder Selection
- アビリティ強化 (Ability Grinding)
- おすすめ選択 (Recommended Selection)
Ability Lv Grinding
- Ability Grinding requires fodder chips of the same name as the base chip.
- Increasing a "passive" chip's [Ability Lv] will increase its activation rate.
- In addition, increasing the ability levels of Photon Art chips will decrease the amount of CP that’s needed to activate the PA.
- You can also increase a chip's ability level by using Nyau or Lillipa chips as fodder.
Chip Grinding (Recommended Selection)
- You can select material chips to increase your chip's stats.
- The recommended selection button will automatically select Rappy Chips as they provide the most amount of EXP to level up a chip.

When you select a material chip, a popup window may display asking how many items you wish to use as fodder. You can increase the amount with the + or – buttons. Press the left button 決定 to enter the quantity. Afterwards, press the 決定 button at the bottom right corner to confirm your choices.
Chip Release / Chip Unlocking

Chip Release and Chip Unlocking are used interchangeably to describe the process of upgrading your chip. Unlocking your chip will upgrade it to its 2nd stage (or even its 3rd stage in the case of ★13 chips.) In order to unlock a chip, you'll need to grind it until it reaches its highest level. Once this is done, you may head to the Chip Unlocking menu and choose a chip that flashes green text.

Chip Unlocking Materials are automatically selected for you if you have them available. If one ore more materials are missing, then you will not be able to proceed. Press the 決定 button in the bottom right corner to begin the process.
You can acquire Material Chips by:
- Playing the [Bonus Scratch] in Emergency Quests
- Playing [Daily Quests] through the Special Quest menu.
- Emergency Quest and Eternal Tower Rewards
You can learn more about Daily Quests through the [Quest] tab.

Once a chip is unlocked, it will have enhanced stats and a new level cap. We recommend leveling up a chip to the highest level it can attain.
13 Star Chip Unlocking

The newest chip rarity to hit the game are ★13 Chips! Their unlocking mechanism is similar to the process described in the previous section, except that they have 3rd unlocking stage known as [Truly Unlocked].
- ★13 Chips have a 3rd [Chip Release] stage called [Truly Unlocked]
- ★13 Chips reduce the cost of PA/Technics of the same element.
- ★13 Chips that are [Truly Unlocked] reduce the cost of PA/Technics of ALL elements.
※Chip Cost refers to the amount of "space" a chip takes up in the palette.
The issue with ★13 Chips are that they require rare unlocking materials. This may require the player to repeatedly attempt [Daily Quests] in search of Metamorphosis Data which they then have to trade in at the Exchange Shop for Core Data to unlock the chip's final stage.
Metamorphisis Data can be retrieved from:
- VH Daily Quests
- Unlocking Materials Exchange in the Exchange Shop
- Emergency Quest Bonus Scratches
Core Data can be retrieved from:
- Unlocking Materials Exchange in the Exchange Shop
- Extra Hard Difficulty Emergency Quest Reward

★13 Chip Level Caps
- 解放前 : Initial Level Cap 50
- 上限解放後 : Released Level Cap 70
- 真・解放 : Truly Unlocked Level Cap 90
Sell Menu

Tap on the chips you wish to sell and press the 決定 button in the lower right corner to open up the confirmation screen. Tap はい in the popup window to sell the items.
Chip Storage

The left side of the menu contains three buttons:
- Item Pack
- Chip Storage
- Storage Expansion (AC)
Select Item Pack and tap on the chips you you like to send to storage. Once you are finished, press the 預ける button in the lower right corner to deposit your chips into storage.
Exchange Shop

The Exchange Shop allows you to trade in useless or unwanted items for powerful chips and weapons. The exchange shop menu changes from time to time, so the list below might be in a different order than what is currently in the game.
| エターナルジュエル交換 Eternal Jewel Exchange |
Eternal Jewels can be obtained through the Eternal Tower. |
| レジャーコイン交換 Leisure Coin Exchange |
Leisure Coins can be obtained through the Leisure Menu |
| 解放素材交換 Unlocking Materials Exchange |
Trade in Rare Enemy Chips or Rare Unlocking Material Chips to receive materials required for ★13 Chip Unlocking. |
| レアエネミーチップ交換 Rare Enemy Chip Exchange |
Trade in Rare Enemy Chips (aka EQ Boss Chips) for units which raise the elemental cap and/or increase the max CP. |
| オペレーションスター交換 Operation Star Exchange |
Trade in Operation Stars from Emergency Quest Ranking Events. The lineup contains Nyau chips which increases a chip's ability level if Nyau is used as fodder for a chip of a matching element. Weaponoid chips are also available in this exchange shop. |
| マテリアルゼロ交換 Material Zero Exchange |
Trade in Material Zero from Extra Hard Emergency Quests Rewards / Achievements and receive a Unit that raises the elemental cap and increases the chance to nullify certain status effects. |
| スクラッチアイテム交換 Scratch Item Exchange |
Trade in AC scratch chips and items for Weaponoids, Specializers, and other chips. |
| ウェポノイド交換 Weaponoid Stone Exchange |
Trade in Weaponoid Stones for Weaponoid Chips. Check the bottom of the Side Story Quest guide for more info. |
| ビギナーアイテム交換 Beginner Item Exchange |
Trade in chips for starter items. |
This completes the [Organize] tab, scroll to the top for the [Shop] menu.
[/tab]
[tab title="Shop"]
Shop Menu
| Shop | |
|---|---|
| ACチャージ Buy AC |
ACショップ AC Shop |
| プレミアムセット Premium Set |
|
Buy AC Menu

An age confirmation screen may appear if it's your first time purchasing Arks Cash. You must first input your birth year and then your birth month. This will restrict the amount of AC an underage person can purchase within a given time period.

Tap the amount of Arks Cash you wish to purchase and press the 決定 to confirm your choice. A Google wallet window will pop up asking you to verify your payment information.
AC Shop Menu

AC Shop
- 行動力回復: Drive Recovery 100 AC or 1 Rappy Medal
- OP回復: Single OP Recovery 100 AC
- チップパック拡張: Chip Pack Expansion 100 AC or 1 Rappy Medal
- 復活薬: Revival Med (x1): 50 AC
- 復活薬: Revival Med (x3): 150 AC
- 復活薬: Revival Med (x5): 250 AC
- OP回復薬: OP Med (x3): 300 AC
- OP回復薬: OP Med (x10): 900 AC
- OP回復薬: OP Med (x30): 2,500 AC
- プレミアムセット30日: 30 Day Premium Set 1,300 AC
- プレミアムセット60日: 60 Day Premium Set: 2,300 AC
- プレミアムセット90日: 90 Day Premium Set 3,300 AC
- PSO2esマイショップ利用券: PSO2es My Shop Ticket (x3): 50 AC
- PSO2esマイショップ利用券: PSO2es My Shop Ticket (x10): 150 AC
- PSO2esマイショップ利用券: PSO2es My Shop Ticket (x25): 350 AC
| Name | Description |
|---|---|
| 行動力回復 Drive Recovery |
Recovers the Drive 行動力 which allows you to initiate a quest. |
| 復活薬 Revival Med |
Allows you to revive when incapacitated during battle. |
| OP回復薬 OP Med |
Recovers Operation Points used to initiate Emergency Quests or Eternal Tower Quests. |
| PSO2esマイショップ利用券 PSO2es My Shop Ticket |
Allows you to purchase an item from the Player Market. You are not required to use this item as Rappy Medals can be used in its place. |
This completes the [Shop] tab, scroll to the top for the [Link] menu.
[/tab]
[tab title="Link"]
Linkage Menu
| Linkage | |
|---|---|
| PSO2es倉庫 PSO2es Storage |
クイック探索 Quick Search |
| コレクトサーチ Collect Search |
ダークブラスト訓練 Dark Blast Training |
| ペット成育 Pet Raising |
マグ成育 Mag Raising |
| マイショップ My Shop |
受け取りカウンター Pickup Counter |
Quick Search

Quick Search allows you to obtain materials used exclusively for PSO2. You will be given 6 opportunities a day to use this feature. The first opportunity is free, the rest will charge AC. You'll have to wait until 5AM for the counter to reset in order to use your free opportunity again.

A [Bonus Mode] is also available that activates after using Quick Search 15 times. You can view this counter in the lower right corner of the screen. Once [Bonus Mode] is activated, you are given a "full" run of five quick searches for FREE!
[toggles class="yourcustomclass"]
[toggle title="Quick Search Area List" ]
| Area | Drops |
|---|---|
| 壊世調査:ナベリウス Ultimate Naberius |
Grinders Galeru Crystal ★13 Nemesis Series ★13 Ares Series ★10 ~ ★12 Weapons ★10 ~ ★11 Units |
| 壊世調査:アムドゥスキア Ultimate Amduscia |
Grinders Synthesizer Phantasmal Ares Stone ★10 ~ ★13 Weapons ★10 ~ ★12 Units |
| 壊世調査:リリーパ Ultimate Lillipa |
Grinders Yurlungur Crystal ★13 Slave Series ★13 Ares Series ★10 ~ ★12 Weapons ★10 ~ ★11 Units |
| 自由探索:黒ノ領域 Free Exploration: Kuron |
Grinders Chandra Shadow Pyroxene Dagger of Serafi Kuron Weapons ★10 ~ ★12 Weapons ★10 ~ ★11 Units |
| 素材収集:森林 Material Search: Forest |
Materials Pickaxes Fishing Rods |
| 素材収集:遺跡 Material Search: Ruins |
|
| 素材収集:火山洞窟 Material Search: Caves |
|
| 素材収集:浮遊大陸 Material Search: Skyscape |
|
| 素材収集:砂漠 Material Search: Desert |
|
| 素材収集:地下坑道 Material Search: Sub. Tunnels |
|
| 素材収集:海岸 Material Search: Coast |
|
| 素材収集:海底 Material Search: Seabed |
|
| 素材収集:白ノ領域 Material Search: Shironia |
|
| 素材収集:黒ノ領域 Material Search: Kuron |
|
| 素材収集:東京 Material Search: Tokyo |
|
| 素材収集:ラスベガス Material Search: Las Vegas |
[/toggle]
[/toggles]
[/tab]
[tab title="Other"]
Other Menu
| Other | |
| システム System |
ヘルプ Help |
| コミュニティ Community |
キャラクター情報 Character Info |
| ストーリー閲覧室 Story Viewing Room |
チップ研究室 Chip Lab |
| タイトル Title |
オプション Options |
Options

バトルカメラ設定 Battle Camera Settings
- Near or Far Slider
[/tab]
[/tabs]
Will the Quick Search list be updated with the most recent Quick Search area? And if so, what can you get from there? I know you can get a Conqueror's Crest, as featured, but what else can you get?
I logged in after a while of not playing and found this https://i.gyazo.com/7b1be896a3932de8a4f2cc0c187ec0ca.jpg
Please explain and update the relevant guide…